


Data Integration between databases
How to ship data between different sources and destinations with Apache Kafka, Kafka Connect, and Debezium connector


In an event-driven architecture, one of the common scenarios, when we are facing a monolith application, is how to get a huge amount of data out of the monolith database. This task became even more complicated when we have to take the stability and uptime of the database into account. We cannot shut down the entire database for a specific time to take a snapshot of the data and even if we can, how can we deal with changes in the primary database?
So, let's break the problem into two pieces:
- Getting a large set of data (or even the whole) out of the database
- Syncing changes
For finding an answer to these questions, we need to specify the target of the data. Where do we want to land our data at the end! The answer to this question is not as simple as it seems. the below answers are just small possibilities
- A destination database with the database engine, for example from a Postgresql source to a Postgresql destination
- A destination database with a different engine, or even a different DBMS. form example from Postgresql to Mysql
- A destination data storage with a different paradigm, for example from a relational database to an Elasticsearch or vice versa.
- A destination cloud storage
- An event broker
- A simple JSON file! This list can contain a dozen of possibilities. although in a controlled environment, we can decide to eliminate lots of possibilities in advance, there are still lots of items left on our list which means our solution needs to support a good level of abstraction and flexibility.
So let's start to find/build the solution:
Data readers and adapters
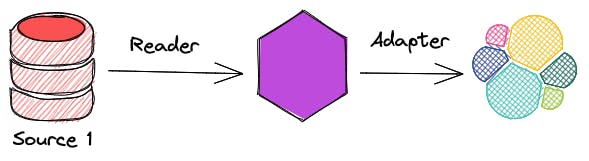
Let's address the first challenge, getting the data. basically, if we look at it from a high-level point of view and ignore all the details we realize all we need are a set of readers and adapters
- Readers: Reading data from the source
- Adapters: Writing data to the destination
However, usually, the situation is more complex by having multiple sources and destinations
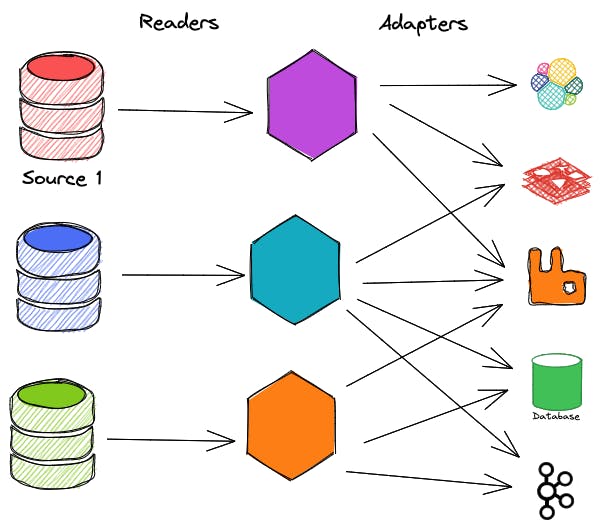
This solution of course would work but there are a couple of caveats that need to consider.
- It's not easy to scale either readers or adapters. for example, how can we deal with a database with hundreds of tables with millions of records each? one possible solution could be running a reader and an adapter for each table but we need to solve the foreign keys in the destination database somehow.
- It's hard to make the process resumable we might need extra storage for readers and adapters to achieve this task
- Although there shouldn't be any complex logic in our readers and adapters we still have to deal with lots of effort for developing and maintaining these applications
apart from the above-mentioned issues, the good news is we at least could address the first challenge, didn't we?
Using triggers to sync changes
Dumping data from source to destination is just the first part of our challenge. We need to make sure all the changes (Create, Update, Delete) that happened in the source are landed in the destination data source, in other words, the source and destination must be eventually consistent. The simplest solution is using triggers. Here's the trigger's definition in Wikipedia:
A database trigger is procedural code that is automatically executed in response to certain events on a particular table or view in a database. The trigger is mostly used for maintaining the integrity of the information on the database.
So we can somehow trigger a piece of code after specific types of events. Awesome, that's exactly what we wanted. All we need to do is define triggers in the source database to mirror the changes to the destination database. Here's is a rough example of how it would look like:
CREATE TRIGGER onProductInsert ON product
FOR INSERT
AS

INSERT INTO product_replica
        (productName, quantity, color)
    SELECT
        (productName, quantity, color)
        FROM inserted
it sounds like a plan the functionalities of triggers are limited. For example, think about these situations: producing a message to a Kafka topic, inserting a document to MongoDB, or updating the value of a specific cache item in Redis, even if it's possible to do all of them in a trigger, it wouldn't be easy.
Using Kafka and Kafka Connect
We've found a solution so far, but it should be a more efficient way to solve this problem. Actually, there is! Apache connect is exactly what we need we can address both challenges effectively.
Here's the definition of Kafka connect from Confluent
Kafka Connect is a free, open-source component of Apache Kafka® that works as a centralized data hub for simple data integration between databases, key-value stores, search indexes, and file systems. The information provided here is specific to Kafka Connect for Confluent Platform.
Kafka connect contains two parts:
- Connectors are responsible to read data from the source and publish them into a Kafka Cluster
- Sinks are connecting to Kafka Cluster as consumers, get the data, and put them into the destination data storage.
So Connectors are what we called Data Readers and Sinks are what we called Data Adapters so far. The good news is there are tons of Sinks and Connectors that are already available in the Confluent Hub that can make our life easier.
So our overall architecture almost changes to this:
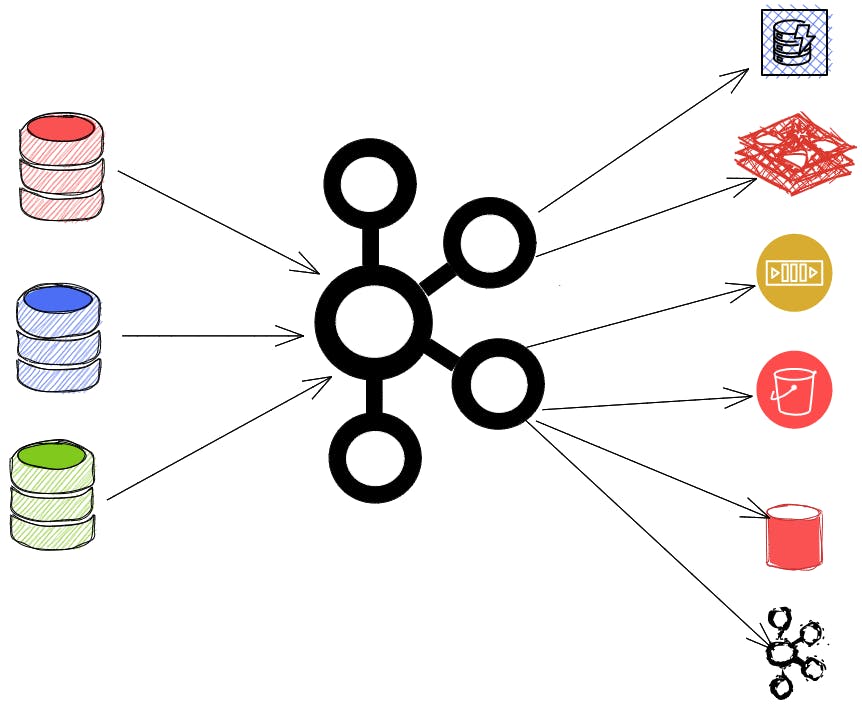
Ok so let's get our hands dirty, using Kafka connect and see the magic.
The first thing we need is a Kafka cluster. Kafka uses Zookeeper for configuration management and more importantly the consensus. They are implementing their own consensus algorithm based on KRaft but it's not ready for production yet.
I'm using docker compose for setting up the entire stack as it's easy to use and widely accepted between developers.
version: "3.9"
services:
  zookeeper:
    image: confluentinc/cp-zookeeper:6.2.1
    container_name: zookeeper
    ports:
      - "2181:2181"
    environment:
      ZOOKEEPER_CLIENT_PORT: 2181
      ZOOKEEPER_TICK_TIME: 2000
  broker:
    image: confluentinc/cp-kafka:6.2.1
    container_name: broker
    depends_on:
      - zookeeper
    ports:
      - "29092:29092"
    environment:
      KAFKA_BROKER_ID: 1
      KAFKA_ZOOKEEPER_CONNECT: 'zookeeper:2181'
      KAFKA_LISTENER_SECURITY_PROTOCOL_MAP: PLAINTEXT:PLAINTEXT,PLAINTEXT_HOST:PLAINTEXT
      KAFKA_ADVERTISED_LISTENERS: PLAINTEXT://broker:9092,PLAINTEXT_HOST://localhost:29092
      KAFKA_OFFSETS_TOPIC_REPLICATION_FACTOR: 1
      KAFKA_GROUP_INITIAL_REBALANCE_DELAY_MS: 0
The configuration is simple, you just need to pass a couple of configs alongside the zookeeper address to the Kafka Cluster as environment variables.
So let's talk about Kafka Connect and how it works. "Kafka connect" runs as a worker so we can deploy it like any other separate service in Virtual machine, AWS, GCP, Kubernetes. technically it's just a Java application. It also has an HTTP API server that runs on port 8083 by default.
"Kafka Connect" is scalable and you can (should) run it in a distributed node. it means each node in the cluster has to know the state of other nodes somehow. For example, when a node is added to the cluster out of the blue, it has to find answers to questions like, what is the current task? what is the status of the running task? what are the records that other nodes are working on right now? what should I pick up!?
No surprise that "Kafka Connect" uses the "Kafka Cluster" itself to keep the state of the jobs.
So what we can expect to set up "Kafka connect" with this information? let's think about it for a second, since it works as a standalone application that has to connect and talk with our Kafka cluster, it definitely needs the cluster's connections information. As it uses Kafka for keeping state it also needs a couple of internal topics for managing state between nodes.
"Kafka Connect" can also use and verify the schema of input and output data via Protobuf, Avro, and JSON. We have to define our schemas in the Schema Registry after that Kafka simply handle the schema of the data in producing and consuming steps by just having the schema id. For the sake of simplicity, in this tutorial, we ignore schema management and validation. After all, the "Kafka Connect" configuration looks like this:
  schema-registry:
    image: confluentinc/cp-schema-registry:6.2.1
    container_name: schema-registry
    depends_on:
      - broker
    ports:
      - "8081:8081"
    environment:
      SCHEMA_REGISTRY_HOST_NAME: schema-registry
      SCHEMA_REGISTRY_KAFKASTORE_BOOTSTRAP_SERVERS: 'broker:9092'
      SCHEMA_REGISTRY_LOG4J_ROOT_LOGLEVEL: WARN
  connect:
    container_name: connect
    build:
      context: .
      dockerfile: connect.Dockerfile
    environment:
      CONNECT_BOOTSTRAP_SERVERS: 'broker:9092'
      CONNECT_GROUP_ID: 'connect'
      CONNECT_CONFIG_STORAGE_TOPIC: 'data-transformer-config'
      CONNECT_CONFIG_STORAGE_REPLICATION_FACTOR: 1
      CONNECT_OFFSET_STORAGE_TOPIC: 'data-transformer-offset'
      CONNECT_OFFSET_STORAGE_REPLICATION_FACTOR: 1
      CONNECT_STATUS_STORAGE_TOPIC: 'data-transformer-status'
      CONNECT_STATUS_STORAGE_REPLICATION_FACTOR: 1
      CONNECT_KEY_CONVERTER: "org.apache.kafka.connect.json.JsonConverter"
      CONNECT_KEY_CONVERTER_SCHEMAS_ENABLE: "false"
      CONNECT_VALUE_CONVERTER: "org.apache.kafka.connect.json.JsonConverter"
      VALUE_CONVERTER_SCHEMAS_ENABLE: "false"
      CONNECT_KEY_CONVERTER_SCHEMA_REGISTRY_URL: "http://schema-registry:8081"
      CONNECT_VALUE_CONVERTER_SCHEMA_REGISTRY_URL: "http://schema-registry:8081"
      CONNECT_REST_ADVERTISED_HOST_NAME: "localhost"
    depends_on:
      - broker
    ports:
      - "8083:8083"
So far we just spin up a "Kafka connect" instance, how can we tell this instance to ship data between source and destination? As we described earlier, Kafka Connect does this with the connectors. Connectors are simply Java applications developed by the community. One of the amazing connectors for getting data out of the database is debezium
What debezium does and How it works
Do you still remember the original problem? We were looking to find a solution for these problems:
- Getting a large set of data (or even the whole) out of the database
- Syncing changes
debezium has amazing solutions for both of these questions and it's scalable as the Kafka Connect scalable itself.
For getting data, it simply just take a snapshot of the current data in the database and ship this into Kafka. But for the CDC part, uses the Write-Ahead log (Binary Log in Mysql) for getting the changes from the leader node. Using WAL is a great alternative for triggers. It's blazingly fast, efficient, and scalable and it has no burden on the leader node's shoulder. The latency of having data in our Kafka Topic is as fast as the follower node getting the latest changes.
If you don't know what Write-Ahead Log (WAL) is, you can think of it as a simple read-only file that has all the INSERT, UPDATE, and DELETE commands in the leader node. whenever a DML command sends to the database engine, it writes the command in the WAL file. So we can reply to all the changes by just running the commands in the file in order. It is worth noting to mention it's just a super-simplified explanation of it for better understanding. Database engines use more elegant solutions of how to use WAL files.
For letting Debezium do its job, we need to change our Postgres config a little and add a couple of permissions. Debezium has a special Docker image based on the Official Postgres image with a couple of small changes.
  product_db:
    image: debezium/postgres:13
    container_name: productdb
    restart: always
    environment:
      POSTGRES_PASSWORD: secret
      POSTGRES_DB: product_db
    ports:
      - "5400:5432"
Our finaldocker-compose.yml file should look like this:
version: "3.9"
services:
  product_db:
    image: debezium/postgres:13
    container_name: productdb
    restart: always
    environment:
      POSTGRES_PASSWORD: secret
      POSTGRES_DB: product_db
    ports:
      - "5400:5432"

  zookeeper:
    image: confluentinc/cp-zookeeper:6.2.1
    container_name: zookeeper
    ports:
      - "2181:2181"
    environment:
      ZOOKEEPER_CLIENT_PORT: 2181
      ZOOKEEPER_TICK_TIME: 2000

  broker:
    image: confluentinc/cp-kafka:6.2.1
    container_name: broker
    depends_on:
      - zookeeper
    ports:
      - "29092:29092"
    environment:
      KAFKA_BROKER_ID: 1
      KAFKA_ZOOKEEPER_CONNECT: 'zookeeper:2181'
      KAFKA_LISTENER_SECURITY_PROTOCOL_MAP: PLAINTEXT:PLAINTEXT,PLAINTEXT_HOST:PLAINTEXT
      KAFKA_ADVERTISED_LISTENERS: PLAINTEXT://broker:9092,PLAINTEXT_HOST://localhost:29092
      KAFKA_OFFSETS_TOPIC_REPLICATION_FACTOR: 1
      KAFKA_GROUP_INITIAL_REBALANCE_DELAY_MS: 0

  schema-registry:
    image: confluentinc/cp-schema-registry:6.2.1
    container_name: schema-registry
    depends_on:
      - broker
    ports:
      - "8081:8081"
    environment:
      SCHEMA_REGISTRY_HOST_NAME: schema-registry
      SCHEMA_REGISTRY_KAFKASTORE_BOOTSTRAP_SERVERS: 'broker:9092'
      SCHEMA_REGISTRY_LOG4J_ROOT_LOGLEVEL: WARN

  connect:
    container_name: connect
    build:
      context: .
      dockerfile: connect.Dockerfile
    environment:
      CONNECT_BOOTSTRAP_SERVERS: 'broker:9092'
      CONNECT_GROUP_ID: 'connect'
      CONNECT_CONFIG_STORAGE_TOPIC: 'data-transformer-config'
      CONNECT_CONFIG_STORAGE_REPLICATION_FACTOR: 1
      CONNECT_OFFSET_STORAGE_TOPIC: 'data-transformer-offset'
      CONNECT_OFFSET_STORAGE_REPLICATION_FACTOR: 1
      CONNECT_STATUS_STORAGE_TOPIC: 'data-transformer-status'
      CONNECT_STATUS_STORAGE_REPLICATION_FACTOR: 1
      CONNECT_KEY_CONVERTER: "org.apache.kafka.connect.json.JsonConverter"
      CONNECT_KEY_CONVERTER_SCHEMAS_ENABLE: "false"
      CONNECT_VALUE_CONVERTER: "org.apache.kafka.connect.json.JsonConverter"
      VALUE_CONVERTER_SCHEMAS_ENABLE: "false"
      CONNECT_KEY_CONVERTER_SCHEMA_REGISTRY_URL: "http://schema-registry:8081"
      CONNECT_VALUE_CONVERTER_SCHEMA_REGISTRY_URL: "http://schema-registry:8081"
      CONNECT_REST_ADVERTISED_HOST_NAME: "localhost"
    depends_on:
      - broker
    ports:
      - "8083:8083"
We can spin up all the services by running docker-compose up -d. You can change your setup by running docker-compose ps. What you'd see should look like this:

OK, if you still reading this tutorial, you are really serious to learn more about Kafka Connect. What we have done so far, is just running up a couple of services and wiring them up together. I mean, we really did nothing so far! fortunately, the rest is going to be easier because we delegate most of our work to the well-tested Kafka Connectors.
Now, it's time to tell the connector to do its job. If you look at the configuration, we still haven't told the connectors which database they should connect to! We have to define our connectors to "Kafka Connect" via the HTTP APIs provided for us. Each connector has a set of configurations that are kind of unique for that connector. It means for getting more details about the configurations, you need to refer to the connection's documentation. In this tutorial, we are using Debezium connector.
For defining configuration we can send an HTTP PUT request to Kafka Connect API /connectors/{meaningful_connector_name}/config
curl --location --request PUT 'http://localhost:8083/connectors/connector-debezium-product-001/config' \
--header 'Content-Type: application/json' \
--data-raw '{
    "connector.class": "io.debezium.connector.postgresql.PostgresConnector",
    "database.hostname": "product_db",
    "database.port": "5432",
    "database.user": "postgres",
    "database.password": "secret",
    "database.dbname" : "product_db",
    "database.server.name": "fulfillment"
  }'
This could be done with a POST request as well, but the PUT request acts like InsertOrUpdate, and since this operation is idempotent, I prefer to use the PUT method.
Let's check everything has wired correctly so far by sending a GET request to http://localhost:8083/connectors
[
    "connector-debezium-product-001"
]
You can get more details about each connector:
// GET: http://localhost:8083/connectors/connector-debezium-product-001/status
{
    "name": "connector-debezium-product-001",
    "connector": {
        "state": "RUNNING",
        "worker_id": "localhost:8083"
    },
    "tasks": [
        {
            "id": 0,
            "state": "RUNNING",
            "worker_id": "localhost:8083"
        }
    ],
    "type": "source"
}
If there are data available in the database, the connector has started to ship the data as it spun up. The database was empty so it's just ready for capturing changes in the source database. Let's create an application that simply inserts data into our database every second. I'm using Kotlin for this application. Since this tutorial is not about learning Kotlin, I'm just quickly mentioning the library that I used for that. It's a good idea to use meaningful data even in testing. it helps in debugging especially when you are working on a distributed system that needs to follow the data along with different systems. I used Faker to generate relatively meaningful fake data. For connecting and working the database I used Jetbrains newly developed ORM named Exposed
// build.gradle.kts
plugins {
    kotlin("jvm") version "1.6.10"
}

group = "com.devmarkpro.connector"
version = "1.0-SNAPSHOT"

repositories {
    mavenCentral()
}

dependencies {
    implementation(kotlin("stdlib"))
    implementation("org.jetbrains.exposed", "exposed-core", "0.37.3")
    implementation("org.jetbrains.exposed", "exposed-dao", "0.37.3")
    implementation("org.jetbrains.exposed", "exposed-jdbc", "0.37.3")
    implementation("org.postgresql:postgresql:42.2.2")
    implementation("io.github.serpro69:kotlin-faker:1.9.0")
}
fixedRateTimer uses for running a function in a period of time. I set it to fire every 1000 milliseconds (every second)
import io.github.serpro69.kfaker.faker
import org.jetbrains.exposed.dao.id.IntIdTable
import org.jetbrains.exposed.sql.*
import org.jetbrains.exposed.sql.transactions.transaction
import kotlin.concurrent.fixedRateTimer
import kotlin.random.Random

object Product : IntIdTable() {
    val name = varchar("name", 500)
    val price = double("price").default(0.0)
    val color = varchar("color", 50).nullable()
    val category = varchar("category", 50)
    var quantity = integer("quantity").default(0)
    val description = varchar("description", 1000).nullable()
    val internalId = varchar("internalId", 50)
}

fun main() {
    val db = Database.connect(
        "jdbc:postgresql://127.0.0.1:5400/product_db",
        driver = "org.postgresql.Driver",
        user = "postgres",
        password = "secret",
    )
    val faker = faker{}
    fun toss(): Boolean = Random.nextDouble() < 0.5
    fixedRateTimer("timer", false, 0L, 1000) {
        transaction(db) {
            addLogger(StdOutSqlLogger)
            SchemaUtils.create(Product)
            val productName = faker.commerce.productName()
            val productId = Product.insert {
                it[name] = productName
                it[price] = Random.nextDouble()
                it[color] = faker.color.name()
                it[category] = faker.commerce.department()
                it[quantity] = Random.nextInt(0, 100)
                it[description] = if (toss()) faker.lorem.punctuation() else null
                it[internalId] = faker.code.asin()
            } get Product.id
            println("product $productId : $productName inserted")
        }
    }
}
By running the application, Kafka Connect starts pushing changes to the Kafka Cluster.
Let's look at the data that we have in Kafka. First, let's take a look at the Kafka topics in our cluster by running docker-compose exec broker kafka-topics --describe --zookeeper zookeeper:2181. this command probably shows a lot of topics in Kafka but most of them use internally for Kafka cluster and Kafka connect. The topics that we are looking for is related to the Product Table so let's filter the output:
docker-compose exec broker kafka-topics --describe --zookeeper zookeeper:2181 | grep product

Your output might be a little bit different than mine, but there must be a topic that the name contains the product! now let's consume the topic and see what data is flowing in it.
There are a couple of ways to consume a Kafka topic, you can use one of the Kafka GUI out there, you can write a simple application to consume the topic and print received data in a file or in the console. In this tutorial, we are using kafka-console-consumer command-line tool for doing so by executing docker-compose exec broker kafka-console-consumer --bootstrap-server broker:9092 --topic fulfillment.public.product This is a long-running command and keeps consuming the topic unless to send a SIGINT signal. Anyway, you should see the data is coming into the Kafka topic.
If you look at the data that prints out to the console you'd see there are a couple of cool things inside the data. Debezium is not just sending the data, it sends the schema of the data as well, that's because altering table commands is not causing a separate message so it's always a good idea to match the data with the schema.
In the payload field you can see before and after properties in our case before is null as we just insert the data but if it's an update command you'll get both versions of the data.
There is also possible to modify the data a little or drop a specific column before shipping it to Kafka. Maybe in the future, I will prepare a separate article for these cases as well.
Here's a complete example of the file:
{
    "schema": {
        "type": "struct",
        "fields": [
            {
                "type": "struct",
                "fields": [
                    {
                        "type": "int32",
                        "optional": false,
                        "default": 0,
                        "field": "id"
                    },
                    {
                        "type": "string",
                        "optional": false,
                        "field": "name"
                    },
                    {
                        "type": "double",
                        "optional": false,
                        "default": 0,
                        "field": "price"
                    },
                    {
                        "type": "string",
                        "optional": true,
                        "field": "color"
                    },
                    {
                        "type": "string",
                        "optional": false,
                        "field": "category"
                    },
                    {
                        "type": "int32",
                        "optional": false,
                        "default": 0,
                        "field": "quantity"
                    },
                    {
                        "type": "string",
                        "optional": true,
                        "field": "description"
                    },
                    {
                        "type": "string",
                        "optional": false,
                        "field": "internalId"
                    }
                ],
                "optional": true,
                "name": "fulfillment.public.product.Value",
                "field": "before"
            },
            {
                "type": "struct",
                "fields": [
                    {
                        "type": "int32",
                        "optional": false,
                        "default": 0,
                        "field": "id"
                    },
                    {
                        "type": "string",
                        "optional": false,
                        "field": "name"
                    },
                    {
                        "type": "double",
                        "optional": false,
                        "default": 0,
                        "field": "price"
                    },
                    {
                        "type": "string",
                        "optional": true,
                        "field": "color"
                    },
                    {
                        "type": "string",
                        "optional": false,
                        "field": "category"
                    },
                    {
                        "type": "int32",
                        "optional": false,
                        "default": 0,
                        "field": "quantity"
                    },
                    {
                        "type": "string",
                        "optional": true,
                        "field": "description"
                    },
                    {
                        "type": "string",
                        "optional": false,
                        "field": "internalId"
                    }
                ],
                "optional": true,
                "name": "fulfillment.public.product.Value",
                "field": "after"
            },
            {
                "type": "struct",
                "fields": [
                    {
                        "type": "string",
                        "optional": false,
                        "field": "version"
                    },
                    {
                        "type": "string",
                        "optional": false,
                        "field": "connector"
                    },
                    {
                        "type": "string",
                        "optional": false,
                        "field": "name"
                    },
                    {
                        "type": "int64",
                        "optional": false,
                        "field": "ts_ms"
                    },
                    {
                        "type": "string",
                        "optional": true,
                        "name": "io.debezium.data.Enum",
                        "version": 1,
                        "parameters": {
                            "allowed": "true,last,false"
                        },
                        "default": "false",
                        "field": "snapshot"
                    },
                    {
                        "type": "string",
                        "optional": false,
                        "field": "db"
                    },
                    {
                        "type": "string",
                        "optional": true,
                        "field": "sequence"
                    },
                    {
                        "type": "string",
                        "optional": false,
                        "field": "schema"
                    },
                    {
                        "type": "string",
                        "optional": false,
                        "field": "table"
                    },
                    {
                        "type": "int64",
                        "optional": true,
                        "field": "txId"
                    },
                    {
                        "type": "int64",
                        "optional": true,
                        "field": "lsn"
                    },
                    {
                        "type": "int64",
                        "optional": true,
                        "field": "xmin"
                    }
                ],
                "optional": false,
                "name": "io.debezium.connector.postgresql.Source",
                "field": "source"
            },
            {
                "type": "string",
                "optional": false,
                "field": "op"
            },
            {
                "type": "int64",
                "optional": true,
                "field": "ts_ms"
            },
            {
                "type": "struct",
                "fields": [
                    {
                        "type": "string",
                        "optional": false,
                        "field": "id"
                    },
                    {
                        "type": "int64",
                        "optional": false,
                        "field": "total_order"
                    },
                    {
                        "type": "int64",
                        "optional": false,
                        "field": "data_collection_order"
                    }
                ],
                "optional": true,
                "field": "transaction"
            }
        ],
        "optional": false,
        "name": "fulfillment.public.product.Envelope"
    },
    "payload": {
        "before": null,
        "after": {
            "id": 132,
            "name": "Incredible Iron Pants",
            "price": 0.61987811851418,
            "color": "violet",
            "category": "Tools",
            "quantity": 41,
            "description": "?",
            "internalId": "B0009PC1XA"
        },
        "source": {
            "version": "1.7.1.Final",
            "connector": "postgresql",
            "name": "fulfillment",
            "ts_ms": 1641025283281,
            "snapshot": "false",
            "db": "product_db",
            "sequence": "[\"23982504\",\"23982504\"]",
            "schema": "public",
            "table": "product",
            "txId": 622,
            "lsn": 23982504,
            "xmin": null
        },
        "op": "c",
        "ts_ms": 1641025283552,
        "transaction": null
    }
}